heavy on the blabbing. light on photos. brace yourself.
weekly wrap-up/finished object(s) current projects
still chugging along on the usuals and i'm officially bored and wanting something new to add to the mix. so i'm casting-on for two new projects this week and getting ready to start a new spinning project. i've been pretty good in terms of discipline, not starting anything new before finishing something old, but yeah... forget that mess! when projects start going rancid/stagnant, it's time for something else!
on/off the needles
no needles have been freed up, but new needles are getting ready to be occupied.
there will be a finished object for this section on the horizon :)
on/off the spinning wheel
a completely finished skein of merino/yak/bombyx silk! turned out lovely :)
here are the stats: 2oz, plied, 150-160 yds (i'll explain later), 12-13 wpi, dk weight.
this yarn just looks like it wants to be fingerless gloves - warm & toasty - so i'm thinking of using this pattern.
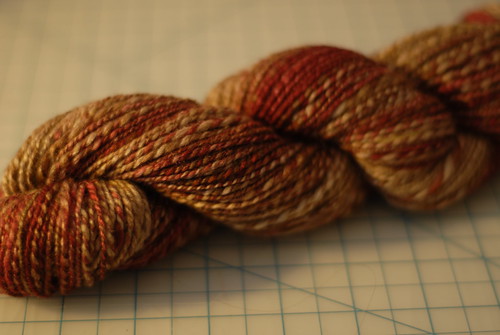
so soft. so lovely.
the skein was wound on a handmade pvc niddy noddy and came out to 160 yds. i wound the skein into a yarn cake to make it easier to knit from, and as i did this, i decided to finally give my yarn meter a try, and also to double check yardage. good thing, because the meter came up at 150 yds. there is a little "fudge" room in there, so i'm going to just take the average and call it 155 yds. below is my set up.
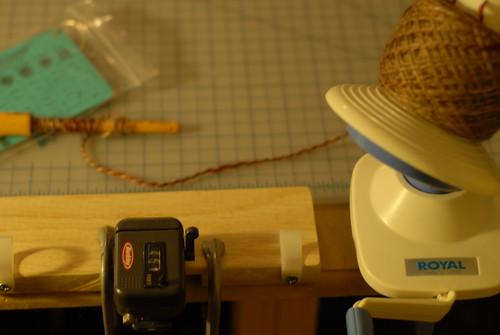
wpi (wraps per inch) tool --> yarn meter --> ball winder
the yarn meter was purchased solo at nancy's knit knacks and the hubster mounted it on a leftover piece of oak, screwed on two plastic cord holders (i think that's what they are...) to use as a yarn guide, and i'm using two small c-clamps to place the meter wherever i'd like. it's ultra low tech and the total cost was no more than about $25. function over form. the yarn meter reads in feet, so whatever number you get, just divide it by 3 for your yardage. in my case i got 451, hence 150 yds.
what i learned...
starting from the end, next time around, i will try to wind the yarn cake directly from the bobbin and wheel. it seems i always run into a little trouble winding a yarn cake from my yarn swift. *sigh* no matter how well the skein is prepared and prepped, no matter how much i go out of my way to make sure i've pulled the right end out, no matter how slow i go, or if my hubby helps, it just always seems like i end up with a tangle or an unnecessary fuzz knot at some point. life is too short to get frustrated over this type of thing!
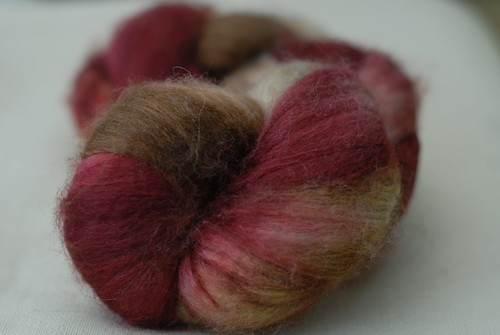
the before photo
the next thing i learned was how to manage color. kind of. or at least i got a good lesson in how these multi-colored fibers work during the spinning process. this is definitely something i've been struggling to wrap my mind around.
as you can see from what the fiber looked like before (above), i had 3 colors to manage - maroon, chocolate brown, and a silvery beige. i separated my fiber into two, 1 oz pieces, splitting the braid right down the middle, and then split that long pieces into about 5 or 6 smaller, more manageable pieces. when i started spinning the first ounce, i just did it kind of haphazard. no rhyme or reason. just grabbed and went with it.
the second ounce was a little more controlled - i took more time to pay attention to the lengths of color, sectioned the ounce by color so i ended up with around 8 smaller separate pieces, took more time to "stretch" the fiber, taking advantage of the long staple length of the silk, took more time working on getting a consistent size. when i plied the singles, the result was mostly a "barber pole" effect on most of the areas, with a little color matching in random places. the barber pole results in a "heathered" fabric when knitted - something that "clicked" after the fact. the areas where there are long lengths of one color will result in a block of color or a striped area. not a bad thing, just something that seems obvious now that i learned this time around. the other fibers i've worked with have been either natural colored or a solid color, so this was a nice introduction. also a nice segue into my new spinning project.
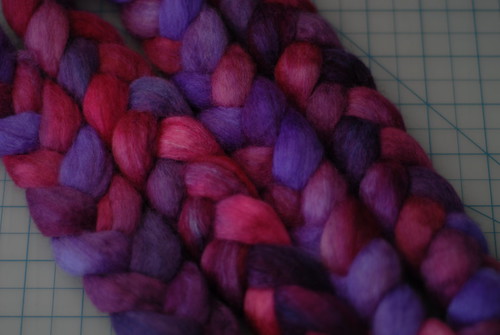
braided goodies
i am going to spin the sweetgeorgia 2011 february fiber club fiber that i received on valentine's day into a yummy sock yarn. i'm aiming for 300 yds. at least that is the hope. ha! and it will be a high twist 3-ply for durability.
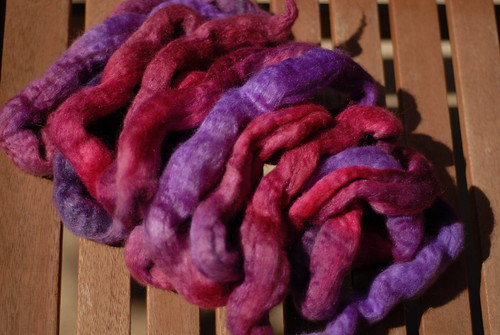
so this is the fiber, and as you can see, the color stripes are relatively long - about 4-5" on average. i divided the 4 ounces of fiber into three, app. 1.3 oz pieces and now i am ready to get started. i've also wound the fiber up into 3 balls according to color, so the piece sticking out on the top is the same color on each ball, and also the order in which i will start spinning - i'm aiming for clear plied colors as much as possible because i want beautiful striped socks. definitely trying to be a little more methodical this time around instead of haphazard. i'm sure no matter what i spin, i will love deeply, but if i take the time to learn from each project early on (and take notes!), i know i will be spinning perfect yarn and appropriate yardage for specific projects in no time. i'm also planning to "navajo ply" my singles to aid in maintaining my clear colors on this project. clear colors meaning no barber poles (different colors plied together, especially those with high contrast). so new techniques all around for me here. new year's craftolutions in full effect!

not one of my best photos, but you get the idea ;)
the last thing i learned was that i could spin the merino/yak/silk fiber much faster and finer. of course, i realized this way after the fact. yeah, maybe i could've swapped out my "regular" flyer for my "fast flyer" but at the time, i didn't put 2-and-2 together in regards to why i was hearing so much knocking on the wheel! i kept thinking, loosen the break band, treadle faster, go to the highest ratio (10:1 on the regular from what i remember). so on this new project, i'm going to try out the "fast" flyer and let the longer staple lengths of the bfl and silk do their magic. i have been doing my part in terms of research - consulting my small spinning book library to educate my self on wheel mechanics and the differences in fibers, but nothing beats practice. practice made it real for me.
whew! ok, enough about that. my head is spinning ;)
on/off the sewing machine
lots on. nothing off ;)
the good news is that over the weekend, i woke up and thought "hey, i should finish a sewing project"... i usually don't have this thought in my head on most days, so this is a good sign of things to come.
honestly, as much as i do love sewing, it's much harder for me to get motivated in this department. lots of prep to get a project started, and more frustrating of a task for me as my craft lab is a small 11'x11' room in which all my knitting, spinning and sewing tools (including 6 sewing machines) and equipment are crammed into. yes, it's quaint and i feel the love every time i enter my creative space as i'm being hugged on all sides by "stuff"... it's occasionally difficult (and annoying) that every time i want to start a sewing project, i have to spend a hefty percentage of my time clearing cutting space, and then rearranging things so i have a space to place a sewing machine and a table top ironing board. ugh. occasionally it feels like a chore, and i don't want it to feel this way. it really saddens me to think that my space restriction occasionally inhibits me from sewing.
but on the flip side, don't cry for me, put away the violins. seriously. none of the above keeps me from working. honestly, if you really want to do something, you are going to do it! that's my philosophy anyway. i make it work. there are many benefits to smaller spaces - one important benefit to the lab is that it's south facing. and you know what that means for one who is clearly reptilian... my room stays warm most of the day (without the use of a heater) so that's a huge plus for me. if the room were much larger, the heating may not work out so well. the other benefit is management. because i don't have much space, i am more aware of how much "stuff" is in my room, and it helps me keep the urge to bring in more in check. this is really important to me. one of the last really important things here is that because i don't have much space to sprawl, i stay on top of keeping all my work areas tidy. and there ain't nothing wrong with that!
there are things that i've done to help aid in making "space" - i've temporarily removed the doors on the closet, which has given me an additional 3 feet of floor space and has allowed me to move all my storage bins out of the work area (and has helped make the room much larger).
anyway, i'm still trying to set my space up as efficiently as possible, and the key to productivity (imo) is that one should always keep their workspace organized and tidy, or tidy up the workspace at the end of the day. even if you are planning to use the materials or the space again the next day, just tidy it up and put things in their proper places or in such a way that it's not tossed around. that way, if you chose not to work on that project, you still have a clean work area and space for a new project. i try to keep crucial areas (the sewing machine table and a space on my work table) clear and free of clutter, so i never have an excuse as to why i can't use the space. clutter stifles creativity.
helpful links
youtube
Navajo Ply - this is one of a few decent videos. still a little hard to see what is going on, but one of the better videos i've found. make sure your volume on the video is up to the highest otherwise it will be difficult to hear!
websites/blogs
Handmade PVC niddy noddy and how the hell you use this mess!
books
spinning help from beginning to end: The Intentional Spinner and Start Spinning
both books are chock full of great information from the beginning to the end of the spinning process. i think i did a review of this sometime back (can't find it, so maybe i dreamt it ), but the visuals in both books are invaluable to one who is visual. great clear images. one section in both books i felt was lacking in the visual department was on how to use a niddy noddy. i searched high and low for a youtube video, but people were either going too fast in the demo or the camera was so far back that i couldn't clearly see what was going on. then of course my smart a$$ husband walks in and is like "oh, let me show you" and then boom, done. *side eye* i was like, oh... was it that obvious! :P no one likes a know-it-all. hahahaaaa
fiber 101 references: In Sheep's Clothing and The Knitter's Book of Wool
i enjoyed both books, but i defintely feel like it's beneficial to have a few of these resource books on hand as one will be lacking in one area and the other books will hopefully fill in the necessary holes.
i wish there were color images in "in sheeps clothing" of both the animal and lock, as well as more insight on how one would spin the fiber. on the flip side, there is a great deal of info on various sheep (including rare breeds) which is a great read. there are some smaller, detailed sections at the back of the book on selecting and cleaning a fleece and a fantastic section on techniques - hand-carding, drafting, plying, etc. great info.
in "the knitter's book of wool" there are some gaps that have been filled (definitely in terms of colored images and sketches of some of the sheep). lots of helpful info on how one would address spinning specific fibers, colored photos of the locks, patterns in the book for a number of the fibers discussed, and even a section discussing non-wool fibers (silk, mohair, alpaca, etc). great book. again, both books are great together... separately lacking some elements. but this is how reference books are. it's hard to cover it all.
until next time!
No comments:
Post a Comment