Last week was a total wash for me... I had no energy at all to do a thing. When this happens, all I can do is listen to my body when it tells me that it wants to spend the entire day horizontal on the couch. Maybe it was the weather (of course it was the weather), or maybe it was because I overworked myself the previous week. Who knows. No worries... sometimes you just have to rest.
I managed to muster up enough energy to groom the dogs last week (I really need to bite the bullet on a proper grooming table), and the sun managed to peak it's face out long enough this weekend for a few photo ops: the dogs enjoying their new hair cuts and stash enhancement for a new project.
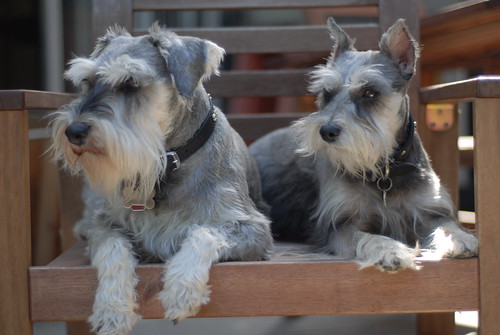
Here are the lovelies, looking all stately and whatnot
The unthinkable happened while I was clipping Mr. Tinsley's nails (doggie on the left)... I cut into the quick/kwik of his nail, the inner part of the nail which contains bled vessels and nerve endings, not once, but thrice! Yowza. He's a trooper; didn't make much noise, just jumped up and shot me the stank eye, which kept me from cutting into the quick of another nail for a total of 4x (boy was I on a roll).
Let this be a lesson to you. Do not trust every tutorial you find online regarding dog grooming! One image I looked at the previous week showed what a properly trimmed nail should look like, and what it would look like as you were trimming when you got close to the quick. Yeah... his nails looked nothing like that! Here's the thing... my dogs have thick, black nails, which makes it nearly impossible to see the quick on each nail. Ok, maybe not impossible, just really, really difficult, and requires a ton of patience (which clearly I do have lots of with the dogs, at least). This equates to total anxiety for me and the dogs on a monthly basis. So 1/16th of a snip here and there is my approach. Tinsley's nails are lllooonnnggg, because clearly he's never had his nails properly trimmed back far enough, and he is a bit of a priss, meaning he is mostly an indoor dog, so he doesn't get his nails filed down from being outside on the pavement the way Riley does (dog on the right). She very seldom gets her nails trimmed, although I check them regularly to make sure they are healthy-looking. The are both equally high maintenance in their own way though... I'll save the "Riley and her damn allergy" stories for another time!
Anyway, I've been grooming my dogs since they were puppies (3 yrs) and usually I'll let the professionals pluck ear hair, trim nails, express anal glands... you know all the dirty work that you'd rather have your dog associate with someone else? Ha! But I like to keep everything in-house (get it?) so recently, I've taken it upon myself to do it all. And by all, I mean all, including expressing anal glands. [Side Bar: Anal gland expressing = $25 for something that is relatively a piece of cake with the right tools. Riley needs hers expressed about 1x a month, Tinsley, maybe 1-2x a year, so you can see how quickly that would add up].
So now the pressure is off regarding the daunting "don't cut the quick" nail trimming task, because honestly, a lot of hype goes into trimming a dog's nails. It makes one almost terrified to do it because it sounds like, inevitably, blood shed will ensue The key is clipping the nails in tiny little pieces, bit-by-bit. Don't go trim happy, hacking off an inch... that would result in unnecessary trauma and bloodshed. The bleeding wasn't bad (remember, tiny pieces) just a little red was seen on the tip of the 3 nails (ew!) which quickly subsided after plugging the wound up with the stypic powder. Apparently this magic powder does work wonders to stop any bleeding as well as acts as a mild pain reliever. This was my first time having to use it. Never cut your dogs nails without this nearby. Oh, also try to avoid using the "guillotine" style nail trimmers. They tend to be a lot harder on the dogs nail, a lot more pressure is required to use them, visibility of the nail gets obstructed, and they can do more damage than good if you don't know what you're doing. So, Mr. furball survived the first casualty and let me finish the job. Also keep the most yummy smelling and tasty treats on-hand to distract from blunders. Dogs are easy ;) Tinsley is a total trooper. He actually sleeps when I trim his nails, go figure. All in all, a successful grooming day, which gets to be repeated again in 3 weeks. Ugh! hahahaaa
So now the pressure is off regarding the daunting "don't cut the quick" nail trimming task, because honestly, a lot of hype goes into trimming a dog's nails. It makes one almost terrified to do it because it sounds like, inevitably, blood shed will ensue The key is clipping the nails in tiny little pieces, bit-by-bit. Don't go trim happy, hacking off an inch... that would result in unnecessary trauma and bloodshed. The bleeding wasn't bad (remember, tiny pieces) just a little red was seen on the tip of the 3 nails (ew!) which quickly subsided after plugging the wound up with the stypic powder. Apparently this magic powder does work wonders to stop any bleeding as well as acts as a mild pain reliever. This was my first time having to use it. Never cut your dogs nails without this nearby. Oh, also try to avoid using the "guillotine" style nail trimmers. They tend to be a lot harder on the dogs nail, a lot more pressure is required to use them, visibility of the nail gets obstructed, and they can do more damage than good if you don't know what you're doing. So, Mr. furball survived the first casualty and let me finish the job. Also keep the most yummy smelling and tasty treats on-hand to distract from blunders. Dogs are easy ;) Tinsley is a total trooper. He actually sleeps when I trim his nails, go figure. All in all, a successful grooming day, which gets to be repeated again in 3 weeks. Ugh! hahahaaa
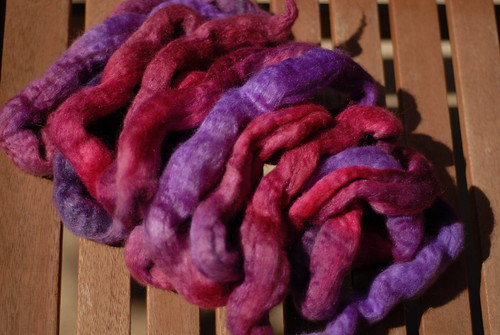
On the other front, Mawata, also referred to as silk hankies (100% pure silk), seems to be all the rage right now in the knitting world thanks to fellow knitter the Yarn Harlot, who shared her recent project using lovely hand-painted silk hankies, that left most of us crushing hard and scouring the internet for places to purchase hankies! Luckily, I didn't have to go far. A knitting buddy (aka queen enabler Denise) brought all the Yarn Harlot/Mawata goodness to the group's attention, mentioning she was interested in making a purchase, and of course... you already know. Lately, I've been on a silk kick. Spinning it has proven to be nothing but wonderful, and I'm a sucker for vibrant, rich, saturated colors, and color like that doesn't get any better than it does on silk!
Ok, let me show you the goods. Drooling is absolutely acceptable.
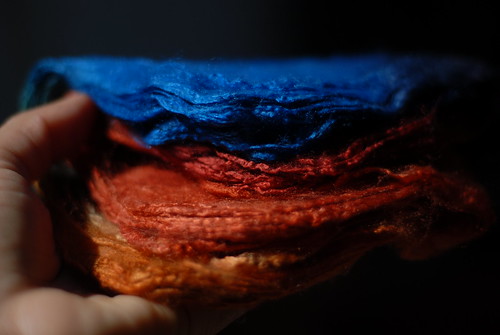
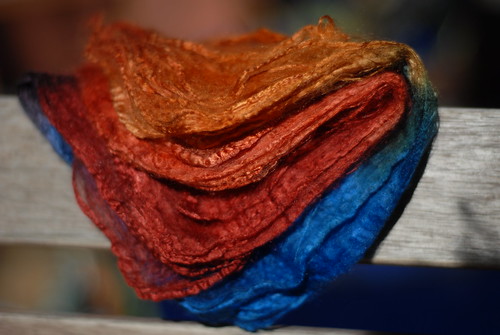
These hankies are from Outback Fibers. They come in 10 gram packs of about 16-18 layers of hankies. You can see the layers on the above pictures. Now if you are wondering what happens next, don't worry... I've done a little research and have asked many questions already, because I was having a hard time wrapping my head around what you do with it after you stop drooling over the colors. So pretty, right? Here is a youtube video showing how to prep it for knitting - you knit it right off the hankie, no spinning required. *love* The sidekick in the video is hilarious :D There is also a new group on Ravelry for support and inspiration. My mawata wants to be something really simple and pretty. Something that will show off the beautiful colors, but something that will be used to keep my poor fingers (or toes) warm and toasty. Still searching for the "perfect" project.
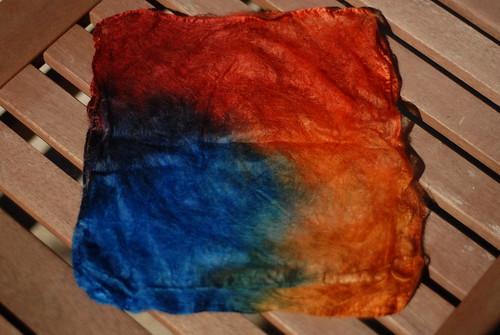
The colorway I have is "Kimberly Blue"... how appropriate right? [Side bar: My name is Kimberly, if you don't know]. The colors remind me of a Macaw (minus the yellow) - vibrant, tropical, full of life and... colorful! These colors take me away to a warm, tropical paradise. *sigh* Can't wait til Spring. The timing on this purchase was perfect; I was freezing my [fill in the blank with all the above body parts] off in my cold house, digits totally numb making it uncomfortable to get anything done (yes, I'm a sissy and cold-sensitive), and silk is the perfect solution. Silk is warm and insulating in cold weather, very cool and absorbent in warm weather, light, shiny and holds color very well. Having a "Textiles 101" flashback.
Other than that, I'm wrapping up a few projects (check the side bar... I'm almost done with a few). Missed my end of February deadline, but that's ok. My resolutions are still coming along nicely, so that makes me proud. I was out of commission last week and taking that time to rest up, but this week... well, lets just say it's going to be relatively sunny. So you know what that means... productivity will go shoot the roof. Hopefully ;)
Here are a couple sneak peeks into my projects for March...
Will be turning this into a 3-ply sock yarn (hopefully)
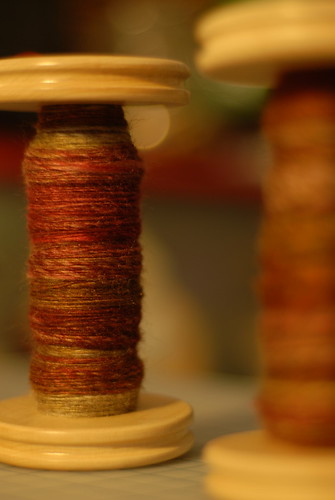
Will be turning 2 bobbins of this into fingerless gloves (hopefully)
Until then!
No comments:
Post a Comment